Customize your THEOlive player
Apply the styling that you like to your player
Using the PATCH https://api.theo.live/channels/<channel-id> endpoint, it is possible to apply an ample set of styling options to your player. A player has a one-to-one relationship with your channel, so updating the customization of your channel will update the styling of your player. In this guide we will discuss all the options in detail, please refer to our API reference to play around with the option and construct your request.
Table of contents
- Changing the colors of your player
- Pre-live settings: announcement and poster image
- Showing a logo
- Enabling auto-play
- Applying customization via the management console
Changing the colors of your player
Being able to use your own set of colors is one of the first things that comes to mind when you think about applying your own style. The THEOlive API makes it possible to set three colors:
- The primary color will be used for the big play button
- The secondary color will paint the control bar icons and the time display
- The tertiary color will be applied to the control bar background
It is possible to pass a hex, rgb and textual ("red", "green", ...) value to the API. Below is an example where we update the customization object of our channel: we update the value of all three colors. If you don't pass one color property (for example tertiary), the default color or the color that was defined in an earlier call will be used.
Below is an example of a JSON body to update the colors.
{
	"customization": {
    	"colors": {
        	"primary": "red",
       		"secondary": "#3cb097",
        	"tertiary": "rgb(161, 79, 148)"
    	}
 	 }
}
Passing this JSON body will result in the player below:
- a red color for the volume slider (and big play button when paused) = the primary color
- a blue color for the control bar icons (pause, mute, ...) = the secondary color
- a purple color for the background of the control bar = the tertiary color

Example with the colors defined in the JSON object above
In case you would only like to change the secondary color, for example, you can pass the following JSON body:
{
	"customization": {
    	"colors": {
       		"secondary": "#3cb097"
    	}
 	 }
}
Pre-live settings: announcement and poster image
When you're not streaming yet, the video player will just show a black background and the standard announcement message "The live stream hasn't started yet". You can customize this by setting an announcement message and/or a poster image.
The customization object allows for the announcement and posterImg properties to be set. For announcement any text value is allowed, for posterImg we expect you to pass a location of an image. You have to host this image somewhere yourself on a server and pass the image location URL. This URL has to end with the .svg, .jpg, .jpeg, .gif or .png extension.
In the JSON object below, a new announcement message has been set, and the location of an image hosted on a server is included.
{
	"customization": {
    	"announcement": "We will start in a minute!",
   		"posterImg": "https://cdn.theo.live/posters/waiting.png"
 	 }
}
This will result in the following player when the live stream isn't started yet:
Pre-live player settings example with an announcement and poster image
If you want to delete the poster image, you can just set an empty string for the posterImg property:
{
	"customization": {
   		"posterImg": ""
 	 }
}
Showing a logo
You can pass a logo that will be displayed at the top-left of the video. Setting a logo is very similar to setting a poster image, which is described in the section above: you only have to pass a valid image location URL to the logo property. The JSON body below will show you how:
{
	"customization": {
   		"logo": "https://console.theo.live/static/media/logo-hq.8446dfe0.svg"
 	 }
}
The outcome of this call is depicted below:
Example with our own THEOlive logo
If you want to remove the logo, you can just set an empty string as value for the logo property:
{
	"customization": {
   		"logo": ""
 	 }
}
Logo not showing in iOS full screen mode
When setting the player to full screen mode in iOS, the native iOS full screen mode will be used. The way this is handled by iOS means that some stylings will not be defined: the default iOS play control bar will be used, and also the logo will not be shown.
Enabling auto-play
It's possible to enable auto-play by setting the autoplay property to true using Channel Update endpoint. Depending on the browser that's being used, the player will try to start the stream automatically. Some browsers allow this to happen with sound, other browsers will do this in a muted state.
Below you can find an example of the JSON body:
{
	"customization": {
   		"autoplay": true
 	 }
}
Optimizing latency, network resilience
If your network is experiencing high variability or issues that may affect your stream, you may want to increase the channel network resilience. This increases the latency in a controlled way, allowing for a bigger buffer. In good network conditions, this is not required and so the default position for this is <1s, for subsecond latency, but you can opt to prioritize the network resilience, choosing a target latency until up to 5 seconds.
Below you can find an example of the JSON body:
{
    "customization": {
        "targetLatency": 2
     }
}
Applying customization via the management console
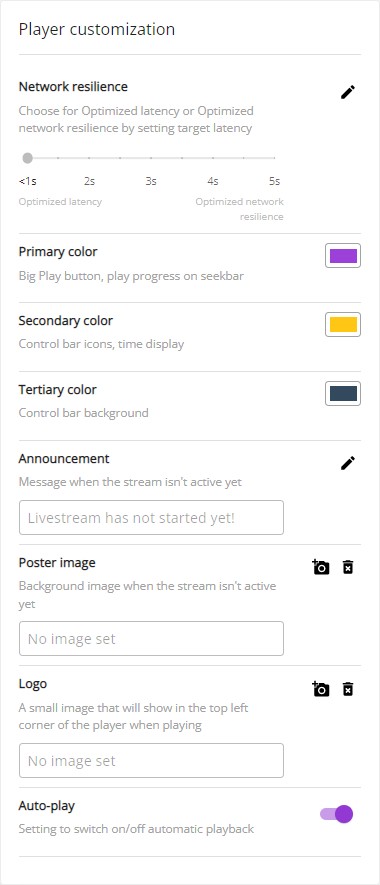
Each action that has been described throughout this document can also be accomplished using the management console. When navigating to the channel Details Page, you can select different colors, set an announcement message, a poster image, and a logo.

Customization options in the management console
Looking for more player customizations?
As an alternative to using the THEOlive player embed script, it is also possible to self-host a THEOlive NPM player to further customize the player. For more information, you can consult How to use a self-hosted player (through NPM).
Updated 4 months ago